I want to emphasize that this isn't the be-all-end-all by any means, but I've had good success with it!
 |
| Reserve Champion of Breyer Original Finish Division, Sea to Bay '20 Model: Woodland Splendor |

Step One: Let's choose a model
In this case, let's use my PS Midge: |
| Peter Stone Midge, 2018 Equilocity SR LE 30 in Gloss Finish |
Now, let's take a look at a few key identifiers:
In reference to Midge, she is:
- Coloring/Markings- Black Pinto with Two Stockings, one Half-Stocking, and one Pastern
- Breed Standards- The PS Pony has many basic trademarks of your average pony type, the most notable of which is her height (ponies may be at most 14.2 hands high)
- Type- In her case, this is fairly similar to "Confirmation", in the sense that she has a very pony-like physique.
Step Two: Establishing the breed
Although the real-life Midge was a Shetland Pony, I don't quite believe that the Shetland Pony is the best choice. So, what now, if not her original breed? Research! Some of my favorite websites to refer to include: Horse Breeds Info, Oklahoma State University, and The Equinest, in regards to reliable sources of Breed information, though going straight to a breed's registry (for example, the APHA Registry). After doing some research, I stumbled upon a few breeds that may work:
 |
| The Quarter Pony |
 |
| The Paint Pony |
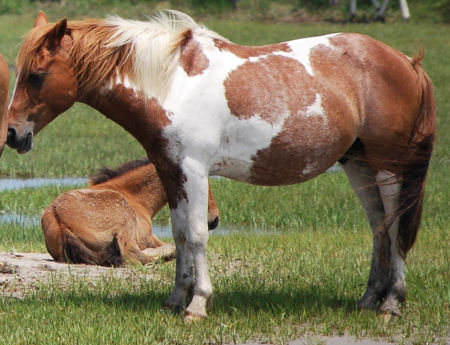 |
| The Chincoteague Pony |
Ultimately, while any of these could have worked, I opted for the Quarter Pony mainly for two reasons: the amount of information available on the breed and confirmational accuracy.
Step Three: Creating the documentation
While creating the breed documentation itself, I try to identify these key points:
- Height
- Colors
- Distinguishing Features
- If the breed has any sub-types (i.e. the three types of Quarter Horse or, more notably, the 'sections' of the Welsh Pony)
So, how do I answer these questions? Primarily, I suggest seeking out the breed's registry, if it has a website. Luckily, the AQPA does have their own site. I tend to err on the side of caution and fact-check, hence my usage of more than one website in reference. Now, onto answering those questions!
- Height- 11.2-15.2 Hands High (now that's a gap!)
- Colors- all solid and most pinto
- Distinguishing Features- a brief summary what to look for when identifying a Quarter Pony
- No Sub-Types here!
Now that you have the information down, it's time for the photos! What do I look for in a reference photo?
- Confirmational Accuracy (how accurate is the photo, in comparison to the breed characteristics stated?)
- Dynamicity (is the horse in a dynamic pose?) (optional, but I think they make it more visually appealing)
- Resolution/Quality (how high-quality of a photo am I using? Try to avoid grainy photos)
In addition to those qualities, I make an effort to include at least one photo of each of the following criteria into a documentation card:
- Halter/Confirmation Picture
- A Rare/Unusual Color
- Color of the Model
- Position/Stance of the Model (at least matching its gait)
5/20/24 edit: It appears some of these images aren't showing up, but fret not! All of these here are also on the final documentation card (at the top and bottom of this post).
 |
| Halter/Conformational Picture |
 |
| Rare Color |
 |
| Matching Color |
|
| Matching Gait |
Step Four: Making it look pretty
Now that you have everything that you need, in theory, you could be done, but that might look sloppy, and judges do not like sloppy. All that's left to do not is simply tidying up (making sure the fonts are all the same, the font size is what you want it, spell-check, etc...), but equally as importantly, make sure the photos are aligned! "But wait, do you mean by 'aligned'?" Well, I am referring to making sure that one photo isn't, say, much taller than the one next to it, and the like.
The Final Product:
 |
| The Final Product :) |
5/20/24 edit: I now cut out the "made by" part. The more I mull it over, though I've never seen put me at a disadvantage, it's probably pointless if exhibitors' identifying information (initials) goes face-down on the model's toe tag anyway.
One final piece of advice I'd offer is to think out of the box (when possible)! Of course, some molds and models might be pretty stuck in one breed (like molds in special, breed-specific gaits), but it also works to your benefit to spread out your models and avoid putting five in that huge Thoroughbred class.
In fact, the Lonesome Glory mold is stereotypically assigned as a TB, and that makes a lot of sense. Pretty solid choice. But, there are other options! I've shown my Woodland Splendor as an Anglo-Teke, and he got reserve champ of the entire Breyer OF division!
Anyway, I hope y'all enjoyed this as much as I did, and maybe you learned a thing or two! What would you like to see next? Let me know!
(Looking for more documentation help? Might I suggest checking out these resources from Knight's Tale Studio, Braymere Custom Saddlery, Shamrock Farms, Horse Tender Studio, and Five Paws Studio.)
How do you create yours? Do you use documentation? I look forward to reading how y'all do! :)
Breed Standards
No comments:
Post a Comment